
Unless you are creating a simple website, there is little chance of avoiding the need to interact with some form of database when building modern web applications.
Unfortunately, this usually means you have to get your hands dirty with Structured Query Language (SQL)—which is just about nobody’s idea of fun. In Django, the messy issues with SQL is a solved problem: you don’t have to use SQL at all unless you want to. Instead, you use a Django model to access the database.
Django’s models provide an Object-relational Mapping (ORM) to the underlying database. ORM is a powerful programming technique that makes working with data and relational databases much easier.
Most common databases are programmed with some form of SQL, but each database implements SQL in its own way. SQL can also be complicated and difficult to learn. An ORM tool simplifies database programming by providing a simple mapping between an object (the ‘O’ in ORM) and the underlying database. This means the programmer need not know the database structure, nor does it require complex SQL to manipulate and retrieve data (Figure 4-1).
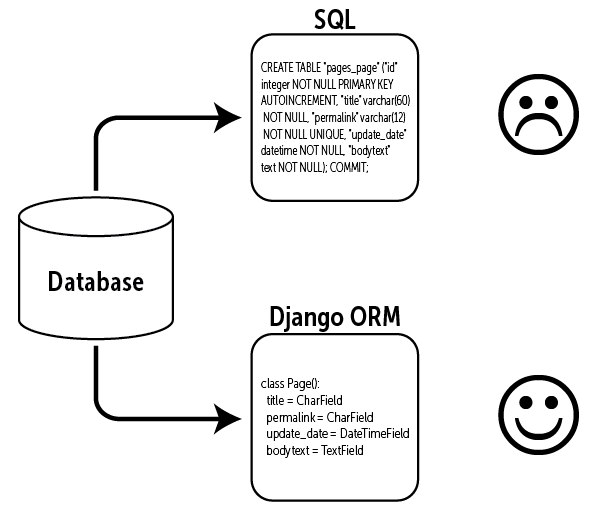
Figure 4-1: An ORM allows for simple manipulation of data without having to write complex SQL.
In Django, the model is the object mapped to the database. When you create a model, Django executes SQL to create a corresponding table in the database (Figure 4-2) without you having to write a single line of SQL. Django prefixes the table name with the name of your Django application. The model also links related information in the database.
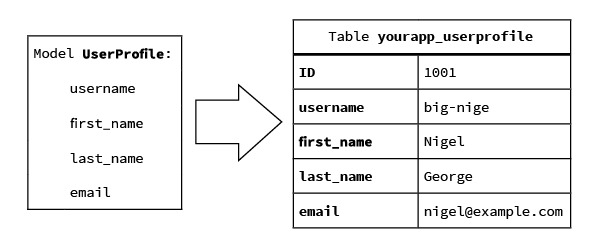
Figure 4-2: Creating a Django model creates a corresponding table in the database.
In Figure 4-3, a second model keeps track of a user’s course enrollments. Repeating all the user’s information in the yourapp_Course table would be against sound design principles, so we instead create a relationship (the ‘R’ in ORM) between the yourapp_Course table and the yourapp_UserProfile table.
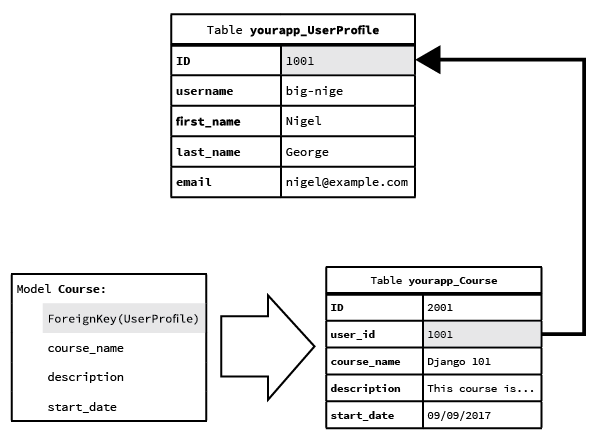
Figure 4-3: Foreign key links in Django models create relationships between tables.
This relationship is created by linking the models with a foreign key. I.e., the user_id field in the yourapp_Course table is a key field linked to the id field in the foreign table yourapp_UserProfile.
This is a simplification, but is a handy overview of how Django’s ORM uses the model data to create database tables. We will dig much deeper into models shortly, so don’t worry if you don’t 100% understand what is going on right now. Things become clearer once you have had the chance to build actual models.
Supported Databases
Django 6.x officially supports recent versions of five databases:
- PostgreSQL
- MySQL
- SQLite
- Oracle
- MariaDB
For the exact version of each database supported by your current Django 6 installation, see the Django database documentation.
There are also several third-party applications available if you need to connect to an unofficially supported database.
The preference for most Django developers, myself included, is PostgreSQL. MySQL is also a common database back end for Django. Installing and configuring a database is not a task for a beginner. Luckily, Django installs and configures SQLite automatically, with no input from you, so we will use SQLite in this book.
I cover running your project with PostgreSQL, MySQL and MariaDB in Chapter 16.
ASIDE: Which Database is Better?
Easy one first. SQLite is for early development and testing. It can be used in production for simple SaaS apps, but you are generally better off using a robust RDBMS like PostgreSQL.
Next easiest answer—Oracle is for big corporations with deep pockets. You are unlikely to need to decide whether to use Oracle unless you join a big enterprise, and then you might find it’s your only choice.
As for PostgreSQL, MariaDB and MySQL, there are specific reasons PostgreSQL is a better database than MySQL. However, by the time you have learned enough programming to understand why, you can judge for yourself. Most often, you don’t get a choice because the client, your employer or the web host makes it for you.
Smart programmers avoid this kind of argument. Use PostgreSQL if you can; otherwise MySQL and MariaDB are fine too.
MariaDB is a direct port of MySQL, so using MariaDB with Django is identical to using MySQL with Django (they even use the same connector).
Defining Models in Python
Django’s models are written in Python and provide a mapping to the underlying database structure. Django uses a model to execute SQL behind the scenes to return Python data structures, which Django calls QuerySets.
Writing models in Python has several advantages:
- Simplicity. Writing Python is not only easier than writing SQL, but it’s less error-prone and more efficient as your brain doesn’t have to keep switching from one language to another.
- Consistency. As I mentioned earlier, SQL is inconsistent across different databases. You want to describe your data once, not create separate sets of SQL statements for each database to which the application will be deployed.
- Avoids Introspection. Any application has to know something about the underlying database structure. There are only two ways to do that: have an explicit description of the data in the application code, or introspect the database at runtime. As introspection has a high overhead and is not perfect, Django’s creators chose the first option.
- Version Control. Storing models in your code-base makes it easier to keep track of design changes.
- Advanced Metadata. Having models described in code rather than SQL allows for special data-types (e.g., email addresses), and provides the ability to store much more metadata than SQL.
A drawback is the database can get out of sync with your models, but Django takes care of this problem with migrations. You’ve already used migrations in Chapter 2 when you created the MyClub application. We’ll be using them again shortly when we create the Event model.
Also note you can introspect an existing database with Django using the inspectdb management command. We’ll be diving deeper into introspecting existing databases in Chapter 16.
Your First Model
Now you have an idea what Django models are, it’s time to create your first model.
The MyClub website application includes an event planner. In the last chapter, we created the events app to manage events within our MyClub web application. If you haven’t created the events app yet, you need to go back to Page [ref] and create it now.
DB Browser for SQLite
Throughout this chapter, and in a few other chapters, I will use an application called DB Browser for SQLite. This is an excellent tool for checking out what is going on inside your SQLite database as Django changes things.
If you want to install DB Browser for SQLite on your machine, you can download it from https://sqlitebrowser.org/.
There is lots of information we can record for a club event, but we will start with a basic event model. When you are first designing a data model, it’s always an excellent idea to map out the table fields before you create the model.
There are many approaches to mapping out data structures—from simple tables to complex data maps using special markup. As you have probably worked out by now, my preference is to keep things as simple as possible, so I tend just to use tables (Table 4.1).
| Field Name | Field Description | Data Type |
|---|---|---|
| name | Name of the event | Short Text |
| event_date | Date and time of the event | Date/Time |
| venue | Location of the event | Short Text |
| manager | Name of the person managing the event | Short Text |
| description | Detailed description of the event | Long Text |
Table 4.1: A simple mapping of our event model fields.
This table should be easy to understand—we have database-friendly names for the fields, a description of the field, and the data-type to save to the field in the database. The description is for your benefit when you come back to the model later and need to remind yourself what the field was for. You can also put the field description in your model as comments or in the model’s docstring. We won’t be adding comments or docstrings to our code in this book. Just keep it in mind for when you become a professional programmer, properly documenting your code is a Good Thing.
Now let’s turn our table into a Django model. Open the models.py file in your events folder and add the following model code:
# \myclub_root\events\models.py

1 from django.db import models
2
3 class Event(models.Model):
4     name = models.CharField('Event Name', max_length=120)
5     event_date = models.DateTimeField('Event Date')
6     venue = models.CharField(max_length=120)
7     manager = models.CharField(max_length=60)
8     description = models.TextField(blank=True)
Let’s have a closer look at your first model, as a fair bit is going on here:
- Line 1 imports the
modelspackage fromdjango.db. If you usedstartapp, this line will already be in your file. - Line 3 is the
Eventclass definition. Each Django model must inherit from Django’sModelclass.
Each of our model fields has a related Django field type and field options. The Event model uses three different field types: CharField, DateTimeField, and TextField. Let’s have a look at the field types and options in more detail:
- Line 4. The
namefield is a DjangoCharField. ACharFieldis a short line of text. Here, themax_lengthoption sets the maximum length of the event name to 120 characters. Thenamefield also has a verbose name argument. The verbose name is used to create a human-friendly name for the model field. Most model fields accept verbose name, either as the first positional argument or as a keyword argument (verbose_name). - Line 5.
event_dateis a DjangoDateTimeField. ADateTimeFieldrecords a Pythondatetimeobject. Theevent_datefield has a single argument: the verbose name for the field. Note that I have named the fieldevent_date, rather than justdate. This is to avoid confusion with Python’sdate()function. Django will let you use function names and Python reserved words in field names, but it’s always best not to. - Lines 6 and 7.
venueandmanagerare both DjangoCharFields. As themax_lengthargument is required onCharFields,max_lengthis set to limit the size of the field. - Line 8.
descriptionis a DjangoTextField. ATextFieldis a large text field that can hold many thousands of characters (the maximum depends on the database). The final option—blank=True—is set so we can create an event without a detailed description. The default for this option isFalse; if you don’t add a description, Django will throw an error in forms and in the admin.
This simple event model only uses a small subset of the model field types and options available in Django. We’ll be using many more throughout the book. There is also a complete reference to all the model fields and options in the Django documentation.
Now we’ve created the model, it’s time to add it to the database. Make sure the virtual environment is running and then change into the myclub_root directory. From your command prompt, run:
python manage.py makemigrations
Code language: CSS (css)
Hit enter and then run the command:
python manage.py migrate
Code language: CSS (css)
Your terminal output should look something like this:
(env_myclub) ...\myclub_root> python manage.py makemigrations
Migrations for 'events':
  events\migrations\0001_initial.py
  - Create model Event
(env_myclub) ...\myclub_root> python manage.py migrate
Operations to perform:
  Apply all migrations: events
Running migrations:
  Applying events.0001_initial... OK
Code language: JavaScript (javascript)
This is all you need to do to add your new model to the database. Before we go on though, remember how I said Django uses the model to generate SQL? Try this command at your command prompt:
python manage.py sqlmigrate events 0001_initial
Code language: CSS (css)
You should get an output that looks like this (I’ve reformatted the output for clarity):
BEGIN;
--
-- Create model Event
--
CREATE TABLE "events_event" (
    "id" integer NOT NULL PRIMARY KEY AUTOINCREMENT,
    "name" varchar(120) NOT NULL,
    "event_date" datetime NOT NULL,
    "venue" varchar(120) NOT NULL,
    "manager" varchar(60) NOT NULL,
    "description" text NOT NULL
);
COMMIT;
Code language: PHP (php)
The sqlmigrate command prints the SQL for the named migration. Here, it’s printing out the SQL for the initial migration, where Django creates the new table and adds the fields to the table.
We can check out what Django created in the database browser (Figure 4.4).
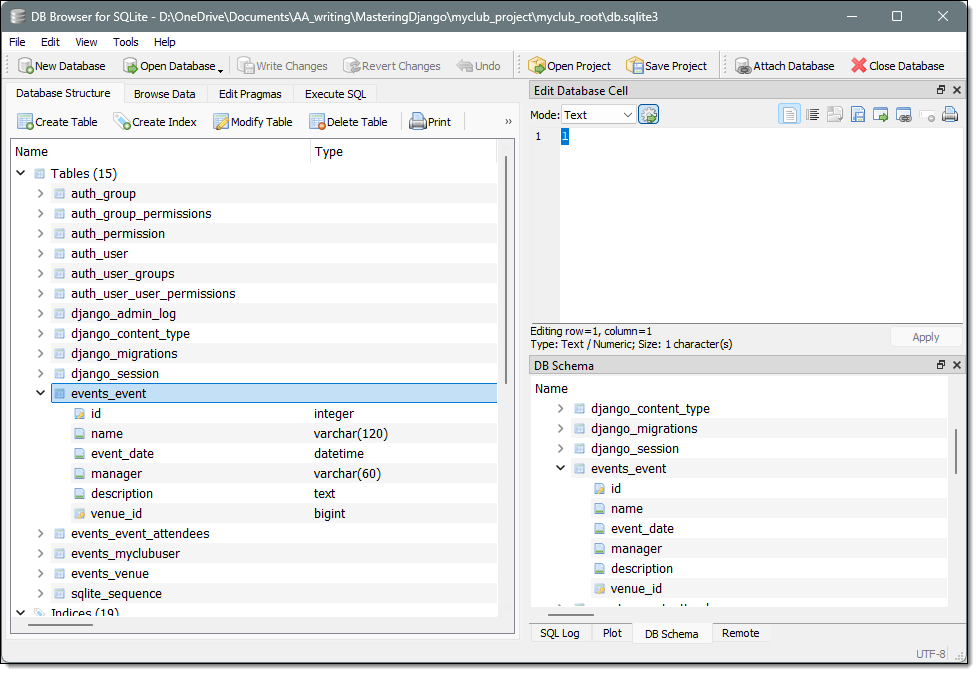
Figure 4.4: The event table in the database.
You can see Django’s <app>_<model> naming convention at work in the table name (events_event). Also, note how each model field is added as a table field with the appropriate data type applied. If you are using DB Browser for SQLite, you will also notice the schema for the table is almost the same as the SQL the sqlmigrate command printed out.
Finally, note that the SQL, data-types and database schema are different for each database type. This is what’s so cool about Django’s models—most of the time, you don’t have to worry about the underlying database when creating your models.
There are some quirks relating to individual database engines, but this is advanced stuff beyond the scope of this book. If you want to check out the notes on individual database engines, see the Django documentation.
Basic Data Access
Django provides the four basic database functions—Create, Read, Update and Delete (CRUD)—you would expect from a web framework designed for data-driven websites. Django, however, uses a high-level Python API to communicate with your database, rather than SQL.
To learn how to use Django’s database API, we will use the Django interactive shell. Django’s interactive shell runs just like the regular Python interactive shell, except it loads the project models, your project’s settings module and other Django-specific modules so you can work with your Django project.
To use the Django interactive shell, you must first be running the virtual environment. Then run the following command from inside your myclub_root folder:
python manage.py shell
Code language: CSS (css)
Your terminal output should look like this:
(env_myclub) ...\myclub_root> python manage.py shell
13 objects imported automatically (use -v 2 for details).
Python 3.14.7 (tags/v3.14.7:823f032, Aug  5 2026, 10:51:32)... on win32
Type "help", "copyright", "credits" or "license" for more information.
(InteractiveConsole)
>>>
Code language: JavaScript (javascript)
Note the first line: “13 objects imported automatically…”. This is Django helping you out by loading a bunch of packages, including your event model, so you don’t have to explicitly import them. If you want to check out what Django loads, try the command Django suggests. In our case:
python manage.py shell -v 2
Code language: CSS (css)
You’ll get the same shell prompt, but it will be preceded by a list of the Django packages and models Django has preloaded for you.
Now, let’s check the Event model is working OK:
>>> Event.objects.all()
<QuerySet []>
>>>
Code language: CSS (css)
The empty QuerySet shows there are no records in the database yet.
NOTE: If you try to do this in the standard Python interactive shell, you will get an error because the basic Python shell won’t load Django, or your project.
Creating Database Records
To create a new event, you must first create a new event object:
>>> from django.utils import timezone
>>> event1 = Event(
...     name="Test Event",
...     event_date=timezone.now(),
...     venue="test venue",
...     manager="Bob"
... )
>>>
Code language: JavaScript (javascript)
Django uses timezone aware dates by default, so you can see I have imported the timezone module from django.utils. If you don’t create a timezone aware date, Django will issue a warning.
I have also created a new Event object and named it event1. Before we move on, have a look at the database (Figure 4.5). You’ll notice Django hasn’t saved the object to the database yet. This is by design. Accessing a database is expensive time-wise, so Django doesn’t hit the database until you explicitly tell Django to save the object.

Figure 4.5: Django doesn’t hit the database until the record is saved.
To save a record to the database, Django has a model method conveniently called save(). So, let’s save the record to the database:
>>> event1.save()
Code language: CSS (css)
Now, when you check the database, you can see the record has been added to the events_event table in the database (Figure 4.6).

Figure 4.6: The record is added when you call the save() method.
As creating and saving objects is so common, Django provides the create() method as a convenient shortcut to create and save a record in one step:
>>> from datetime import datetime as dt
>>> tz = timezone.get_current_timezone()
>>> Event.objects.create(
...     name="Xmas Barbeque",
...     event_date=dt(2026,12,25,12,0,tzinfo=tz),
...     venue="Notareal Park",
...     manager="Bob"
... )
<Event: Event object (2)>
Code language: JavaScript (javascript)
You can see in the above example, I have used the create() method to create a new event record which Django automatically saves for you.
Before we move on, let’s take a closer look at the first two lines. In the first line, we’re importing the datetime object from Python’s datetime module. This allows us to construct a datetime instance for the barbeque event date.
However, Django requires a timezone aware date. As the tzinfo attribute of a Python datetime instance defaults to None, Django will throw a timezone warning.
To avoid this warning, Django conveniently provides the timezone.get_current_timezone() function in django.utils. You can try this out at the shell prompt:
>>> tz
zoneinfo.ZoneInfo(key='UTC')
>>>
Code language: JavaScript (javascript)
If you were wondering where that timezone information comes from, it’s in your settings.py file. Django’s default TIME_ZONE is UTC, but you can change it to your local timezone anytime you like.
Let’s create one more event to use in our examples as we explore models in the Django shell:
>>> event3 = Event(
...     name="NYE Party",
...     event_date=dt(2026,12,31,21,0,tzinfo=tz),
...     venue="McIvor's Bar",
...     manager="Terry"
... )
>>> event3.save()
Code language: JavaScript (javascript)
Or you can use the create() shortcut method to achieve the same result:
>>> Event.objects.create(
...     name="NYE Party",
...     event_date=dt(2026,12,31,21,0,tzinfo=tz),
...     venue="McIvor's Bar",
...     manager="Terry"
... )
<Event: Event object (3)>
>>>
Code language: JavaScript (javascript)
Retrieving Records
Retrieve All Records
To retrieve all the records in a database table, you use the all() method:
>>> event_list = Event.objects.all()
>>> event_list
<QuerySet [<Event: Event object (1)>, <Event: Event object (2)>, <Event: Event object (3)>]>
As you can see, this is not a very useful output; you have no way of knowing which event “Event Object” is referring to. Luckily, Python has a special string representation method you can add to Python functions and classes. Let’s go back to the Event model class declaration and add two lines of code:
# \myclub_root\events\models.py

1  from django.db import models
2
3  class Event(models.Model):
4      name = models.CharField('Event Name', max_length=120)
5      event_date = models.DateTimeField('Event Date')
6      venue = models.CharField(max_length=120)
7      manager = models.CharField(max_length = 60)
8      description = models.TextField(blank=True)
9
10    def __str__(self):
11        return self.name
The magic is in lines 10 and 11. The __str__ method generates a string representation of any Python object. For the Event model, we are simply returning the name of the event.
Restart the Django interactive shell for the changes to take effect. After you have added the __str__ method, your terminal output should look like this:
>>> event_list = Event.objects.all()
>>> event_list
<QuerySet [<Event: Test Event>, <Event: Xmas Barbeque>, <Event: NYE Party>]>
Much better.
Retrieve a Single Record
You retrieve single records with the get() method. You can retrieve a record using its primary key:
>>> Event.objects.get(id=1)
<Event: Test Event>
Code language: HTML, XML (xml)
You can also retrieve a record using one of the field names:
>>> Event.objects.get(name="Xmas Barbeque")
<Event: Xmas Barbeque>
Code language: HTML, XML (xml)
The get() method only works for single objects. If your search term returns multiple records, you will get an error:
>>> Event.objects.get(manager="Bob")
Traceback (most recent call last):

# Lots of traceback info

... get() returned more than one Event -- it returned 2!
>>>
Code language: PHP (php)
And if you try to retrieve a record that doesn’t exist, Django will throw a DoesNotExist error:
>>> Event.objects.get(id=999)
Traceback (most recent call last):

# Lots of traceback info

events.models.Event.DoesNotExist: Event matching query does not exist.
>>>
Code language: PHP (php)
Retrieve Multiple Records
Whereas the get() method can only return a single record, the filter() method allows you to filter your data to return zero or more records.
You can filter with a single search term:
>>> Event.objects.filter(manager="Bob")
<QuerySet [<Event: Test Event>, <Event: Xmas Barbeque>]>
Code language: JavaScript (javascript)
You can also filter with multiple search terms:
>>> Event.objects.filter(manager="Bob", venue="Notareal Park")
<QuerySet [<Event: Xmas Barbeque>]>
Code language: JavaScript (javascript)
In both the above cases, Django translates the search terms into an SQL WHERE clause.
By default, the filter method uses exact match lookups. For more control, you can search using one of Django’s field lookups:
>>> Event.objects.filter(manager="Bob", name__contains="Xmas")
<QuerySet [<Event: Xmas Barbeque>]>
Code language: JavaScript (javascript)
Note there’s a double underscore between name and contains. If you’re curious, the __contains part gets translated by Django into an SQL LIKE statement. See Chapter 9 for an in-depth review of field lookups.
If the search string doesn’t match, filter() will return an empty QuerySet:
>>> Event.objects.filter(manager="Fred")
<QuerySet []>
>>>
Code language: HTML, XML (xml)
If you want to return all records in the database table with filter, you leave the query string blank:
>>> Event.objects.filter()
<QuerySet [<Event: Test Event>, <Event: Xmas Barbeque>, <Event: NYE Party>]>
>>>
Code language: CSS (css)
This is equivalent to using Event.objects.all().
Ordering Data
In the previous examples, records are being retrieved from the database in table order. If you want to sort the records by a field in the table, you use the order_by() method:
>>> Event.objects.order_by("name")
<QuerySet [<Event: NYE Party>, <Event: Test Event>, <Event: Xmas Barbeque>]>
Code language: CSS (css)
If you want to sort in descending order, you add a minus (-) sign before the field name:
>>> Event.objects.order_by("-name")
<QuerySet [<Event: Xmas Barbeque>, <Event: Test Event>, <Event: NYE Party>]>
>>>
Code language: CSS (css)
Internally, Django translates the order_by() method into an SQL ORDER BY statement.
You can also sort by multiple fields:
>>> Event.objects.order_by("manager", "name")
<QuerySet [<Event: Test Event>, <Event: Xmas Barbeque>, <Event: NYE Party>]>
>>>
Code language: CSS (css)
Model Default Ordering
You can see that this would get tedious if you wanted a default ordering for your model and had to use the order_by() method every time you retrieved records from the database.
Django solves this issue with the ordering attribute of Django models’ class Meta method. More about the class Meta method in Chapter 9.
It’s very common to want to set a sort order on a subset of your database records. You achieve this in Django by chaining lookups. This is best illustrated with an example:
>>> Event.objects.filter(manager="Bob").order_by("name")
<QuerySet [<Event: Test Event>, <Event: Xmas Barbeque>]>
>>>
Code language: JavaScript (javascript)
In this example, the filter() method first retrieves all events managed by Bob, and then the order_by() method sorts them in alphabetical order by event name.
Slicing Data
You can also return a fixed number of rows from the database using Python’s list slicing syntax. This is handy for when you are paginating data or want to return the Top 10, say, of a QuerySet.
For example, you can retrieve the earliest event in the database:
>>> Event.objects.all().order_by("event_date")[0]
<Event: Test Event>
Code language: CSS (css)
Or the latest:
>>> Event.objects.all().order_by("-event_date")[0]
<Event: NYE Party>
Code language: CSS (css)
You can even specify a subset of records to retrieve:
>>> Event.objects.all()[1:3]
<QuerySet [<Event: Xmas Barbeque>, <Event: NYE Party>]>
>>>
Code language: CSS (css)
What you can’t do is use negative indexing. So, to retrieve Bob’s last event, this won’t work:
>>> Event.objects.filter(manager="Bob")[-1]
Traceback (most recent call last):

# More traceback info

ValueError: Negative indexing is not supported.
Code language: PHP (php)
To get around this limitation, you use a reverse sort:
>>> Event.objects.filter(manager="Bob").order_by("-event_date")[0]
<Event: Xmas Barbeque>
>>>
Code language: JavaScript (javascript)
Updating Records
Earlier in the chapter, we used Django’s database API to create a new record. Let’s follow the same process and add another record:
>>> from django.utils import timezone
>>> from datetime import datetime as dt
>>> tz = timezone.get_current_timezone()
>>> event4 = Event(
...     name="Bob's Birthday",
...     event_date=dt(2027,2,8,15,0,tzinfo=tz),
...     venue="McIvor's Bar",
...     manager="Terry"
... )
>>> event4.save()
Code language: JavaScript (javascript)
You may have noticed our Event model class doesn’t have a primary (unique) key field defined. This is because Django creates a primary key automatically when it adds a record to the database. Django generates the primary key using the AUTOINCREMENT function of your database. In SQLite, AUTOINCREMENT returns an integer which you can access via the object’s id field:
>>> event4.id
4
Code language: CSS (css)
You can see in Figure 4.7 that this is the same key used by the database.
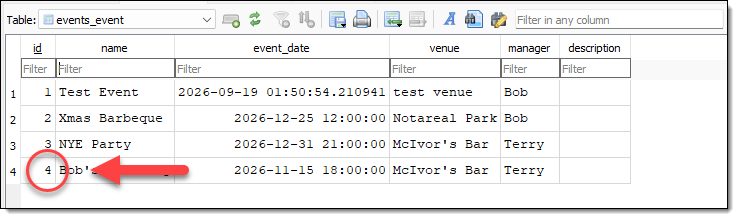
Figure 4.7: The Event object primary key is the same as the database record unique ID.
To update records, you change the instance data and call the save() method again. Each subsequent call to the save() method will update the record:
>>> new_date=dt(2027,1,15,18,0,tzinfo=tz)
>>> event4.event_date=new_date
>>> event4.save()
If you check out the database table, you can see the updated event data (Figure 4.8).
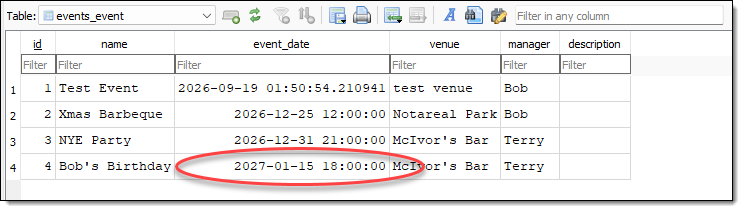
Figure 4.8: Changing instance data and calling the save() method updates the current record.
While this method of updating a database record is simple, it’s inefficient as it will save all the field values, not just the event date. To ensure records are updated in the most efficient manner possible, use the update() method. Rewriting the above process to use the update() method, you get:
>>> Event.objects.filter(id=4).update(event_date=new_date)
1
>>>
update() has an integer return value—the number of records updated.
You can also use update() to modify multiple records. For example, say you want to move all the events at McIvor’s Bar to Ripemoff Casino, you can use the following code:
>>> Event.objects.filter(venue="McIvor's Bar").update(venue="Ripemoff Casino")
2
>>>
Code language: JavaScript (javascript)
The return value tells you that update() has changed two records in the database. If you check the database, you will also see that all events at the bar have moved to the casino (Figure 4.9).
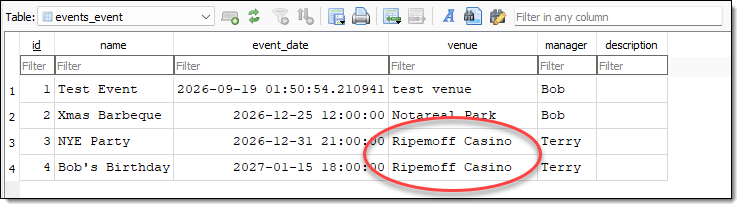
Figure 4.9: The update() method makes updating multiple records easy.
Deleting Records
To delete a record from the database, you use the delete() method:
>>> Event.objects.filter(name__contains="Test").delete()
(1, {'events.Event': 1})
>>>
Code language: JavaScript (javascript)
The return value for the delete() method lists the total number of records affected (one in this example), a dictionary listing the tables affected by the delete operation, and the number of records deleted in each table.
You can delete multiple objects by using a filter that returns more than one record:
>>> Event.objects.filter(manager="Terry").delete()
(2, {'events.Event': 2})
>>>
Code language: JavaScript (javascript)
And you can delete all the records in a table with the all() method:
>>> Event.objects.all().delete()
(1, {'events.Event': 1})
>>> Event.objects.all()
<QuerySet []>
>>>
Code language: HTML, XML (xml)
To prevent accidental deletion of all the data in a table, Django requires you to use the all() method explicitly to delete everything in a table. For example, this code doesn’t work:
>>> Event.objects.delete()
Traceback (most recent call last):
File "<console>", line 1, in <module>
AttributeError: 'Manager' object has no attribute 'delete'
>>>
Code language: JavaScript (javascript)
Creating Relationships
In a data-driven website, it’s rare to have a table of information unrelated to information in other tables. This is primarily due to well-established database design best-practice.
Let’s take the venue field as an example. If you were only saving the venue name in the database, you could get away with repeating the name of the venue multiple times in your database records. But what about if you wanted to save more information for the venue?
Your venue records should also include an address, telephone number, website address and email. If you add these fields to your events table, you can see that you will end up with a lot of repeated information, not to mention the nightmare of ensuring you update all records if some venue information changes.
Database normalization is the process of designing your tables to minimize or eliminate data repetition. In simple terms, normalization is keeping related data in separate tables and linking tables via relationships (hence the name relational database).
Database normalization is also in keeping with Django’s Don’t Repeat Yourself (DRY) philosophy. So, as you would expect, Django makes creating relationships between tables of related information simple.
With our venue example, it would be good practice to have all the venue information in one table, and link to that information from the event table. We create this link in Django with a foreign key. Multiple events linking to one venue record is an example of a many-to-one relationship in relational database parlance. Looking at the relationship in the opposite direction, we get a one-to-many relationship, i.e., one venue record links to many event records.
Django provides QuerySet methods for navigating relationships in both directions—from one to many, and from many to one—as you will see shortly.
There is one other common database relationship that we need to explore, and that is the many-to-many relationship. An excellent example of a many-to-many relationship is the list of people who are going to an event. Each event can have many attendees, and each attendee can go to multiple events. We create a many-to-many relationship in Django with the ManyToManyField.
Let’s dispense with the theory and make some changes to our Event model, add a Venue model and add a MyClubUser model to our events app (changes in bold):
# \myclub_root\events\models.py

1  from django.db import models
2
3  class Venue(models.Model):
4      name = models.CharField('Venue Name', max_length=120)
5      address = models.CharField(max_length=300)
6      zip_code = models.CharField('Zip/Post Code', max_length=12)
7      phone = models.CharField('Contact Phone', max_length=20)
8      web = models.URLField('Web Address')
9      email_address = models.EmailField('Email Address')
10
11     def __str__(self):
12        return self.name
13
14
15 class MyClubUser(models.Model):
16     first_name = models.CharField(max_length=30)
17     last_name = models.CharField(max_length=30)
18     email = models.EmailField('User Email')
19
20     def __str__(self):
21         return self.first_name + " " + self.last_name
22
23
24 class Event(models.Model):
25     name = models.CharField('Event Name', max_length=120)
26     event_date = models.DateTimeField('Event Date')
27     venue = models.ForeignKey(Venue, blank=True, null=True, on_delete=models.CASCADE)
28     manager = models.CharField(max_length = 60)
29     attendees = models.ManyToManyField(MyClubUser, blank=True)
30     description = models.TextField(blank=True)
31
32     def __str__(self):
33         return self.name
Note the order of the classes. Remember, this is Python, so the order of the models in your models.py file matters. The new model classes need to be declared before the Event model for the Event model to be able to reference them.
The Venue model is very similar to the Event model, so you should find it easy to understand. Notice how the Venue model uses two new model fields: URLField and EmailField.
This is another cool feature of Django’s models. While at the database level these fields are no different than Django CharField‘s (they’re all saved as varchar‘s in SQLite), Django’s models provide built-in form input validation for specialized fields like URLs and email addresses. We’ll see this in action later in the book when we start working with forms and the admin.
The MyClubUser model should also be straightforward. At the moment, it’s a simple user model that records the user’s name and email address. We’ll be expanding this model to create a custom user model in Chapter 14.
There are two important changes to the Event model:
- In line 27, I have changed the
venuefield type from aCharFieldto aForeignKeyfield. The first argument is the name of the related model. I have addedblank=Trueandnull=Trueto allow a new event to be added without a venue assigned. Theon_deleteargument is required for foreign keys.CASCADEmeans that if a record is deleted, all related information in other tables will also be deleted. - In line 29, I have added the
attendeesfield.attendeesis a DjangoManyToManyFieldwhich has two arguments: the related model (MyClubUser), andblankset toTrueso an event can be saved without any attendees.
Before we add the new models to the database, make sure you delete the records from the Event table (if you’ve been following along, the table should already be empty). If you don’t run the migration on an empty table, it will fail as the old records won’t be linked to the new table. Go back to the Django interactive shell and delete all event records like so:
(env_myclub) ...\myclub_root> python manage.py shell
...
(InteractiveConsole)
>>> Event.objects.all().delete()
(4, {'events.Event': 4}) # Total records deleted. May be different for you.
>>>exit()
(env_myclub) ...\myclub_root>
Code language: PHP (php)
Don’t forget to exit the interactive shell when you’re done (exit() or CTRL-Z).
Now, let’s add our new model to the database:
(env_myclub) ...\myclub_root> python manage.py check
System check identified no issues (0 silenced).
(env_myclub) ...\myclub_root> python manage.py makemigrations events
Migrations for 'events':
  events\migrations\0002_myclubuser_venue_event_attendees_alter_event_venue.py
    + Create model MyClubUser
    + Create model Venue
    + Add field attendees to event
    ~ Alter field venue on event
(env_myclub) ...\myclub_root> python manage.py migrate
Operations to perform:
Apply all migrations: admin, auth, contenttypes, events, sessions
Running migrations:
Applying events.0002_myclubuser_venue_event_attendees_alter_event_venue... OK
(env_myclub) ...\myclub_root>
Code language: JavaScript (javascript)
After running the migration, you can see that Django has added the events_venue, and events_myclubuser tables, and the venue field in the events_event table has been renamed venue_id and is now a bigint field (Figure 4.10).
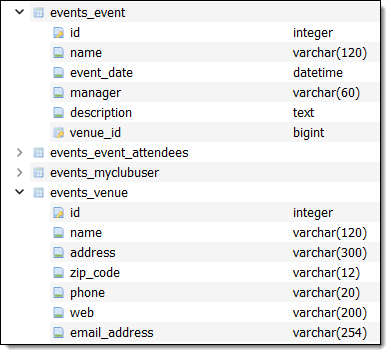
Figure 4.10: Django has added a new table and created a relationship with the event table. Did you notice there’s no attendees field, but there is an events_event_attendees table?
If you look at the event table schema (you can also do this with the sqlmigrate command you used earlier in the chapter) you can see the SQL Django uses to create the relationship:
CREATE TABLE "events_event" (
    "id" integer NOT NULL PRIMARY KEY AUTOINCREMENT,
    "name" varchar(120) NOT NULL,
    "event_date" datetime NOT NULL,
    "manager" varchar(60) NOT NULL,
    "description" text NOT NULL,
    "venue_id" bigint NULL
        REFERENCES "events_venue" ("id")
        DEFERRABLE INITIALLY DEFERRED
)
Code language: PHP (php)
Notice there is no reference to the attendees list in this SQL statement, nor is there an attendees field in the table.
This is because Django handles many-to-many relationships by creating an intermediate table containing each relationship in a simple event_id and myclubuser_id data pair (Figure 4.11).
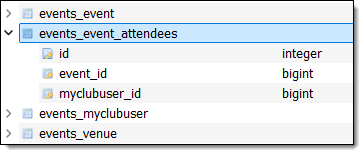
Figure 4.11: Django records many-to-many relationships in an intermediate table.
Looking at the output from sqlmigrate, you can see Django is not only creating the relationships between the events table and myclubuser table, but it also sets up several indexes to make search faster:
CREATE TABLE "events_event_attendees" (
    "id" integer NOT NULL PRIMARY KEY AUTOINCREMENT,
    "event_id" bigint NOT NULL
        REFERENCES "events_event" ("id")
        DEFERRABLE INITIALLY DEFERRED,
    "myclubuser_id" bigint NOT NULL
        REFERENCES "events_myclubuser" ("id")
        DEFERRABLE INITIALLY DEFERRED
    );

...

CREATE UNIQUE INDEX "events_event_attendees_event_id_myclubuser_id_d3b4e7a8_uniq" ON
    "events_event_attendees" ("event_id", "myclubuser_id");
CREATE INDEX
    "events_event_attendees_event_id_45694efb" ON
    "events_event_attendees" ("event_id");
CREATE INDEX
    "events_event_attendees_myclubuser_id_caaa7d67" ON
    "events_event_attendees" ("myclubuser_id");
Code language: PHP (php)
As I mentioned earlier, this SQL will be different for each database. The key takeaway here is Django’s migrations take care of creating relationships in your database at the model level without you having to care about the underlying database structure.
Did you notice how Django also took care of updating the event table for you? Cool, huh?
Working With Related Objects
Because of the bi-directional nature of database relationships, and the need to maintain referential integrity, the basic database actions work differently with related objects.
For example, let’s try to add a new event in the Django interactive interpreter using the same code from the start of the chapter:
>>> from django.utils import timezone
>>> from datetime import datetime as dt
>>> tz = timezone.get_current_timezone()
>>> event1 = Event(
...     name="Test Event",
...     event_date=dt(2026,11,1,18,0,tzinfo=tz),
...     venue="Test Venue",
...     manager="Bob"
... )
Traceback (most recent call last):
# ...
ValueError: Cannot assign "'Test Venue'": "Event.venue" must be a "Venue" instance.
>>>
Code language: PHP (php)
I’ve removed the rest of the traceback from this code to keep things simple. So, what went wrong?
We have created a relationship between the event table and the venue table, so Django expects us to pass an instance of a Venue object, not the name of the venue.
This is one way Django maintains referential integrity between database tables. For you to save a new event, there must be a corresponding venue record in the venue table.
So, let’s create a new venue. I am using the save() method here, but you could also use the create() shortcut method:
>>> venue1 = Venue(
...     name="South Stadium",
...     address="South St",
...     zip_code="123456",
...     phone="555-12345",
...     web="southstexample.com",
...     email_address="southst@example.com"
... )
>>> venue1.save()
>>>
Code language: JavaScript (javascript)
Now we can create an event using the venue instance (venue1) we just created, and the record should save without error:
>>> event1 = Event(
...     name="Test Event",
...     event_date=dt(2026,11,1,18,0,tzinfo=tz),
...     venue=venue1,
...     manager="Bob"
... )
>>> event1.save()
>>>
Code language: JavaScript (javascript)
Accessing Foreign Key Values
Due to the relationship created between the event table and the venue table, when you access the ForeignKey field from an instance of the Event, Django returns an instance of the related Venue object:
>>> event1.venue
<Venue: South Stadium>
Code language: HTML, XML (xml)
You can also access the fields of the related model object with the dot operator:
>>> event1.venue.web
'southstexample.com'
Code language: JavaScript (javascript)
This works in the opposite direction, but because of the asymmetrical nature of the relationship, we need to use Django’s <object>_set manager attribute. <object>_set.all() returns a QuerySet, for example, event_set.all() will return all the events taking place at a particular venue:
>>> venue1.event_set.all()
<QuerySet [<Event: Test Event>]>
Code language: CSS (css)
We are using the all() method here, but all Django’s regular QuerySet slicing and filtering methods will work with <object>_set.
Accessing Many-to-Many Values
Accessing many-to-many values works the same as accessing foreign keys, except Django returns a QuerySet, not a model instance. So you can see how this works, let’s first create a new user:
>>> MyClubUser.objects.create(
...    first_name="Joe",
...    last_name="Smith",
...    email="joesmith@example.com"
... )
<MyClubUser: Joe Smith>
Code language: JavaScript (javascript)
When we added the ManyToManyField to our Event model, a special model manager class called RelatedManager becomes available. RelatedManager has a few useful methods; in this example, we will use the add() method to add an attendee to an event:
>>> attendee = MyClubUser.objects.get(first_name="Joe", last_name="Smith")
>>> event1.attendees.add(attendee)
Code language: JavaScript (javascript)
You can also use the create() shortcut method to add a user and sign them up for an event in one step:
>>> event1.attendees.create(
...     first_name="Jane",
...     last_name="Doe",
...     email="janedoe@example.com"
... )
<MyClubUser: Jane Doe>
Code language: JavaScript (javascript)
As they are QuerySets, accessing many-to-many records uses the same QuerySet methods as regular model fields:
>>> event1.attendees.all()
<QuerySet [<MyClubUser: Joe Smith>, <MyClubUser: Jane Doe>]>
Code language: CSS (css)
And, to follow the relationship in the opposite direction, you use the <object>_set manager attribute:
>>> attendee.event_set.all()
<QuerySet [<Event: Test Event>]>
Code language: CSS (css)
Chapter Summary
In this chapter, we explored the fundamentals of Django’s models. We covered how to define Django models in Python, how to create models, basic data access, and how to create relationships between models.
In the next chapter, we will explore the fundamentals of Django’s views.